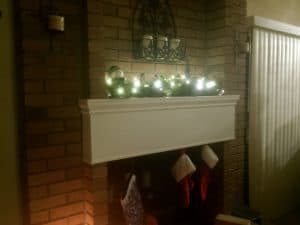
Last year before Christmas I decided that I wanted to decorate the fireplace. Unfortunately, my fireplace had a horrible mantle on it. There were two staggered shelves that were 4″ deep each. I could barely put a candle on them let alone actually decorate them for Christmas. I needed a new, custom fireplace mantle.
So I started an ambitious project to create a new custom fireplace mantle for my house. The new mantle would combine the two shelves depth into one shelf. It would be white, and it would have moulding on it to break up the monotony of a big, white chunk of wood stuck on the fireplace.
I won’t be sharing plans for making a mantle, as it is going to be a really custom process to fit each fireplace. So if you’re sticking around hoping for instructions, sorry!
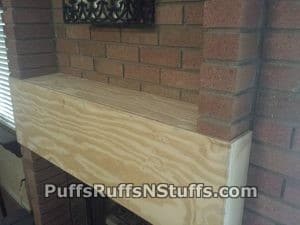
This was one of my very first DIY home decor projects where I actually changed something inside the house. Previously, all of my projects were hanging pictures and other easy decor items. I got the mantle about halfway done before Christmas last year. The shape was there and it was good enough to sit on the current mantle. It had a rough coat of paint, but it was effectively just the ‘big, white chunk of wood stuck on the fireplace’. It was good enough to decorate though, so I was content.
This year, I finally got around to adding the moulding and details to the custom fireplace mantle before Christmas. I have never worked with moulding before so getting the corners to line up was quite a chore.
My mantle was very deceptive – it looks all nice and square and it fits the fireplace like a glove. It is anything but square though and that caused the moulding to need to be cut at not quite a 45°. I picked up a couple of tools (like this Square-Cut tool from Kreg – omg amazing.) since making the mantle that would have made it easier to get the mantle cuts square so the moulding would have fit easier. However since the mantle was already all but done, I really didn’t want to take the time to redo it just because the angles weren’t quite 90°.
So, take a note! When planning on applying moulding to a project, make sure the sucker’s squared to the best of your ability.
In the end, I ended up cutting the moulding pieces at a 45°, then eyeballed to remove thin slices and eventually sanded down the ends until everything fit as best as I could make it. Then the wood filler was called into service. Wood filler is my best friend. It hides all sorts of sins and flaws. I generously applied it to the corners and waited for it to dry. Once the wood filler was dry, I gently sanded the corners to a more “corner-y” shape.
After the filler, I used caulk to hide the gaps between the moulding and the body of the mantle. A couple coats of paint later, I had my new custom fireplace mantle.